If you are an Apple Platforms developer, you know how exciting Apple's annual Worldwide Developers Conference (WWDC) is. For those of us who live and breathe code, WWDC is like Christmas, New Year, and our birthday all rolled into one.
The ultimate event for all things Apple, where they announce new products, features, and updates. Especially this WWDC 2024 where there are big rumours about Apple going all in on generative AI.
But as much as we love WWDC, it is not feasible to fly all the way to Cupertino, or win the golden ticket. Sure, we can watch the keynote and sessions on our own, but it is so much more fun to share the experience with friends and colleagues. That's where the idea for a WWDC Watch Party App comes in!
To build this app, I turned to Stream's Video SDK. Stream's Video SDK is a powerful tool that gives developers everything they need to build rich video capabilities into their apps. With Stream's Video SDK, you can use out-of-the-box UI components with powerful customisation and theming options, or build your own UI while reusing Stream's lower-level logic.
This post is sponsored by Stream, but all views expressed are my own.
Let's dive in and explore how to build a WWDC Watch Party App with Stream's Video SDK.
You can find the final project here: https://github.com/rudrankriyam/WWDC-Watch-Party
Setting Up the Project
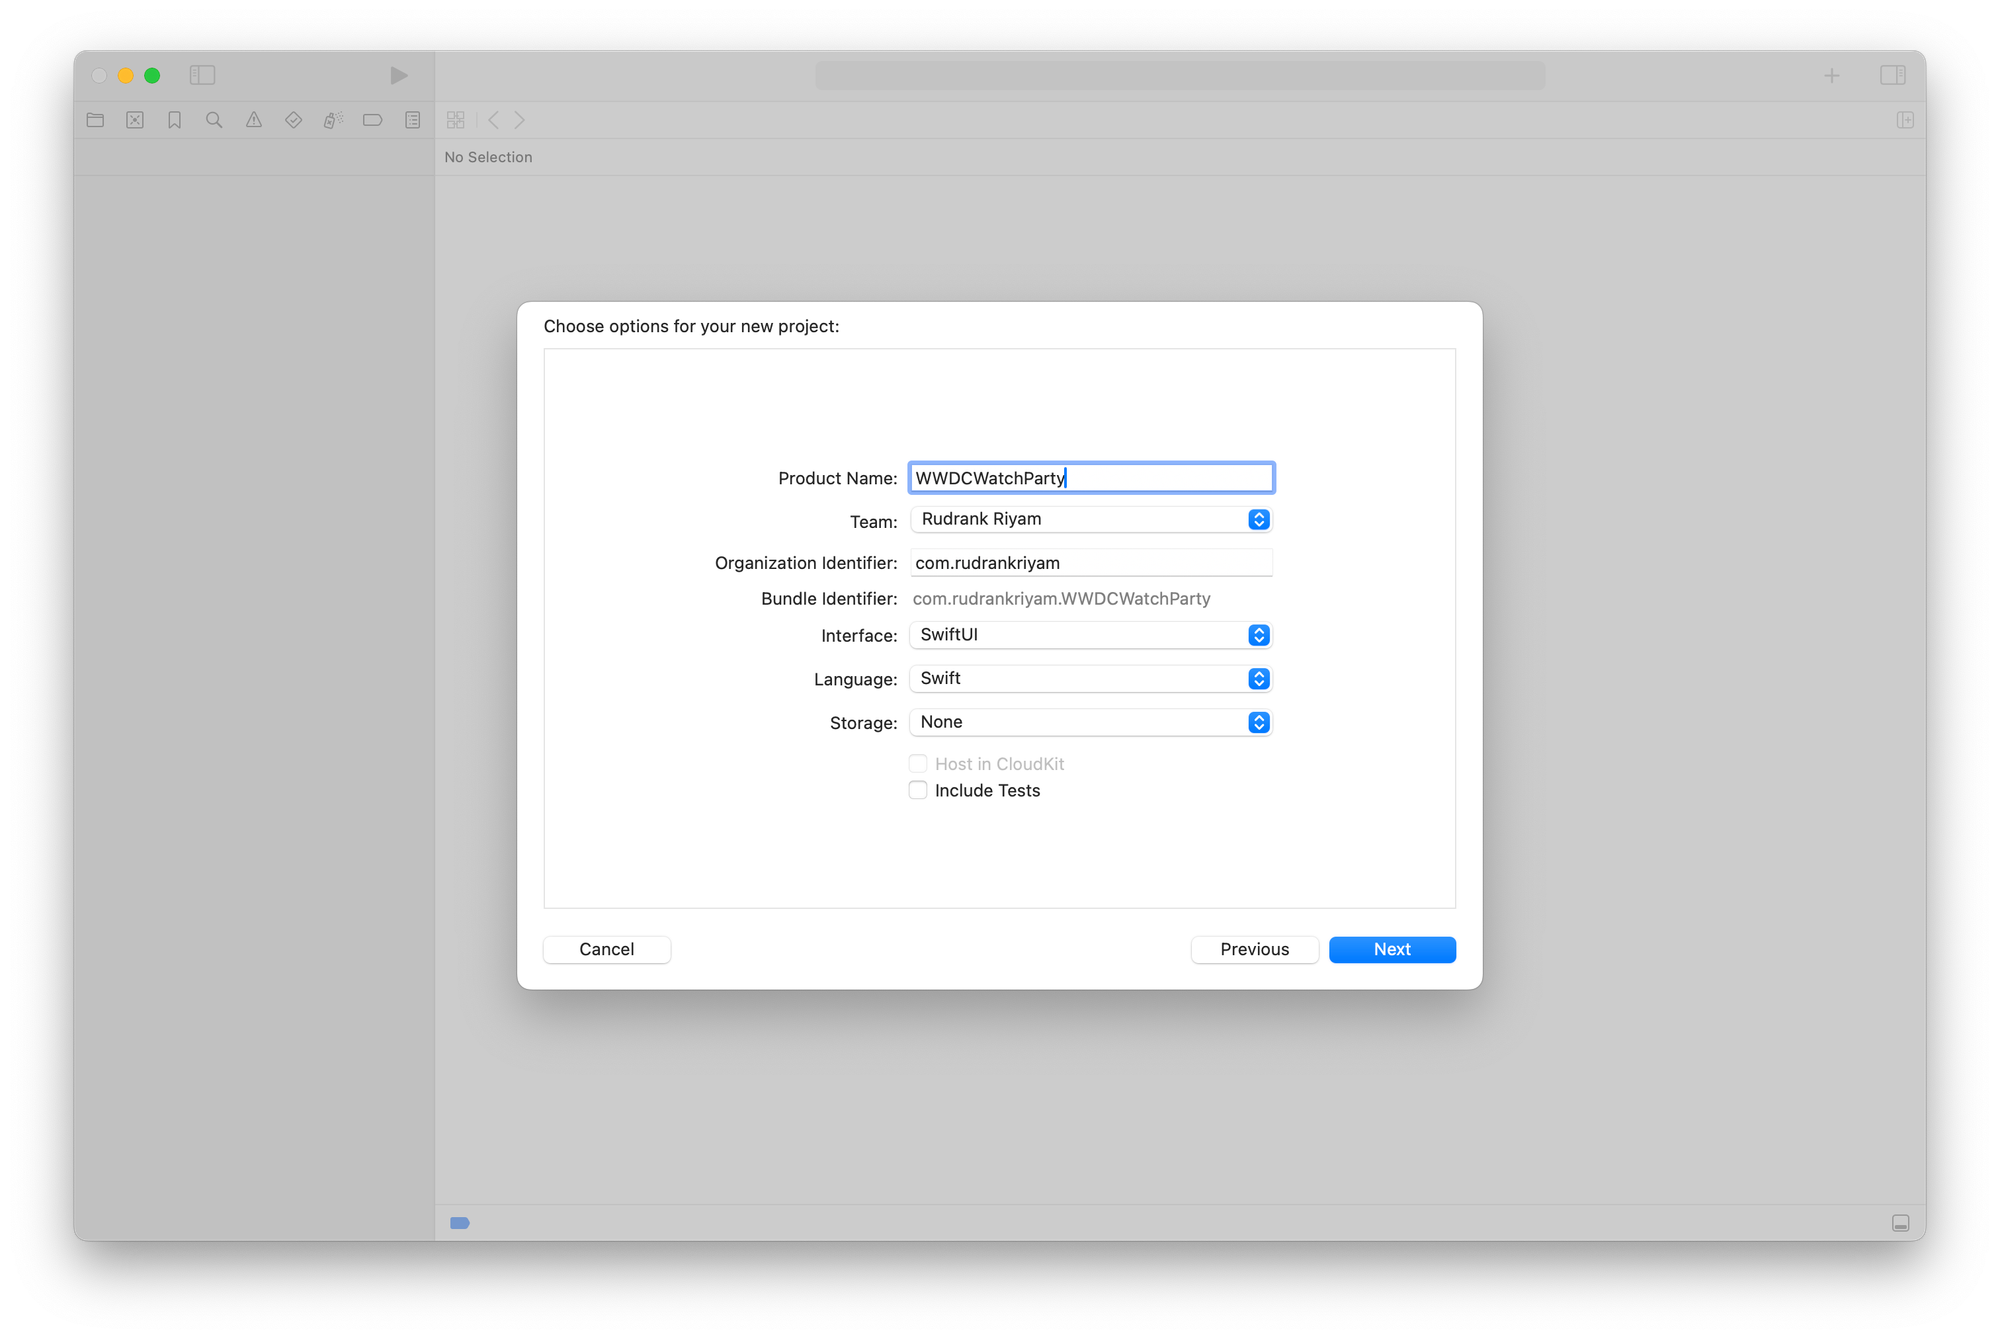
Open Xcode and create a new project. Select "App" under the iOS tab and click "Next". Name your project "WWDCWatchParty" and choose a location to save it. Make sure the "Interface" is set to "SwiftUI". Click "Next" to proceed.
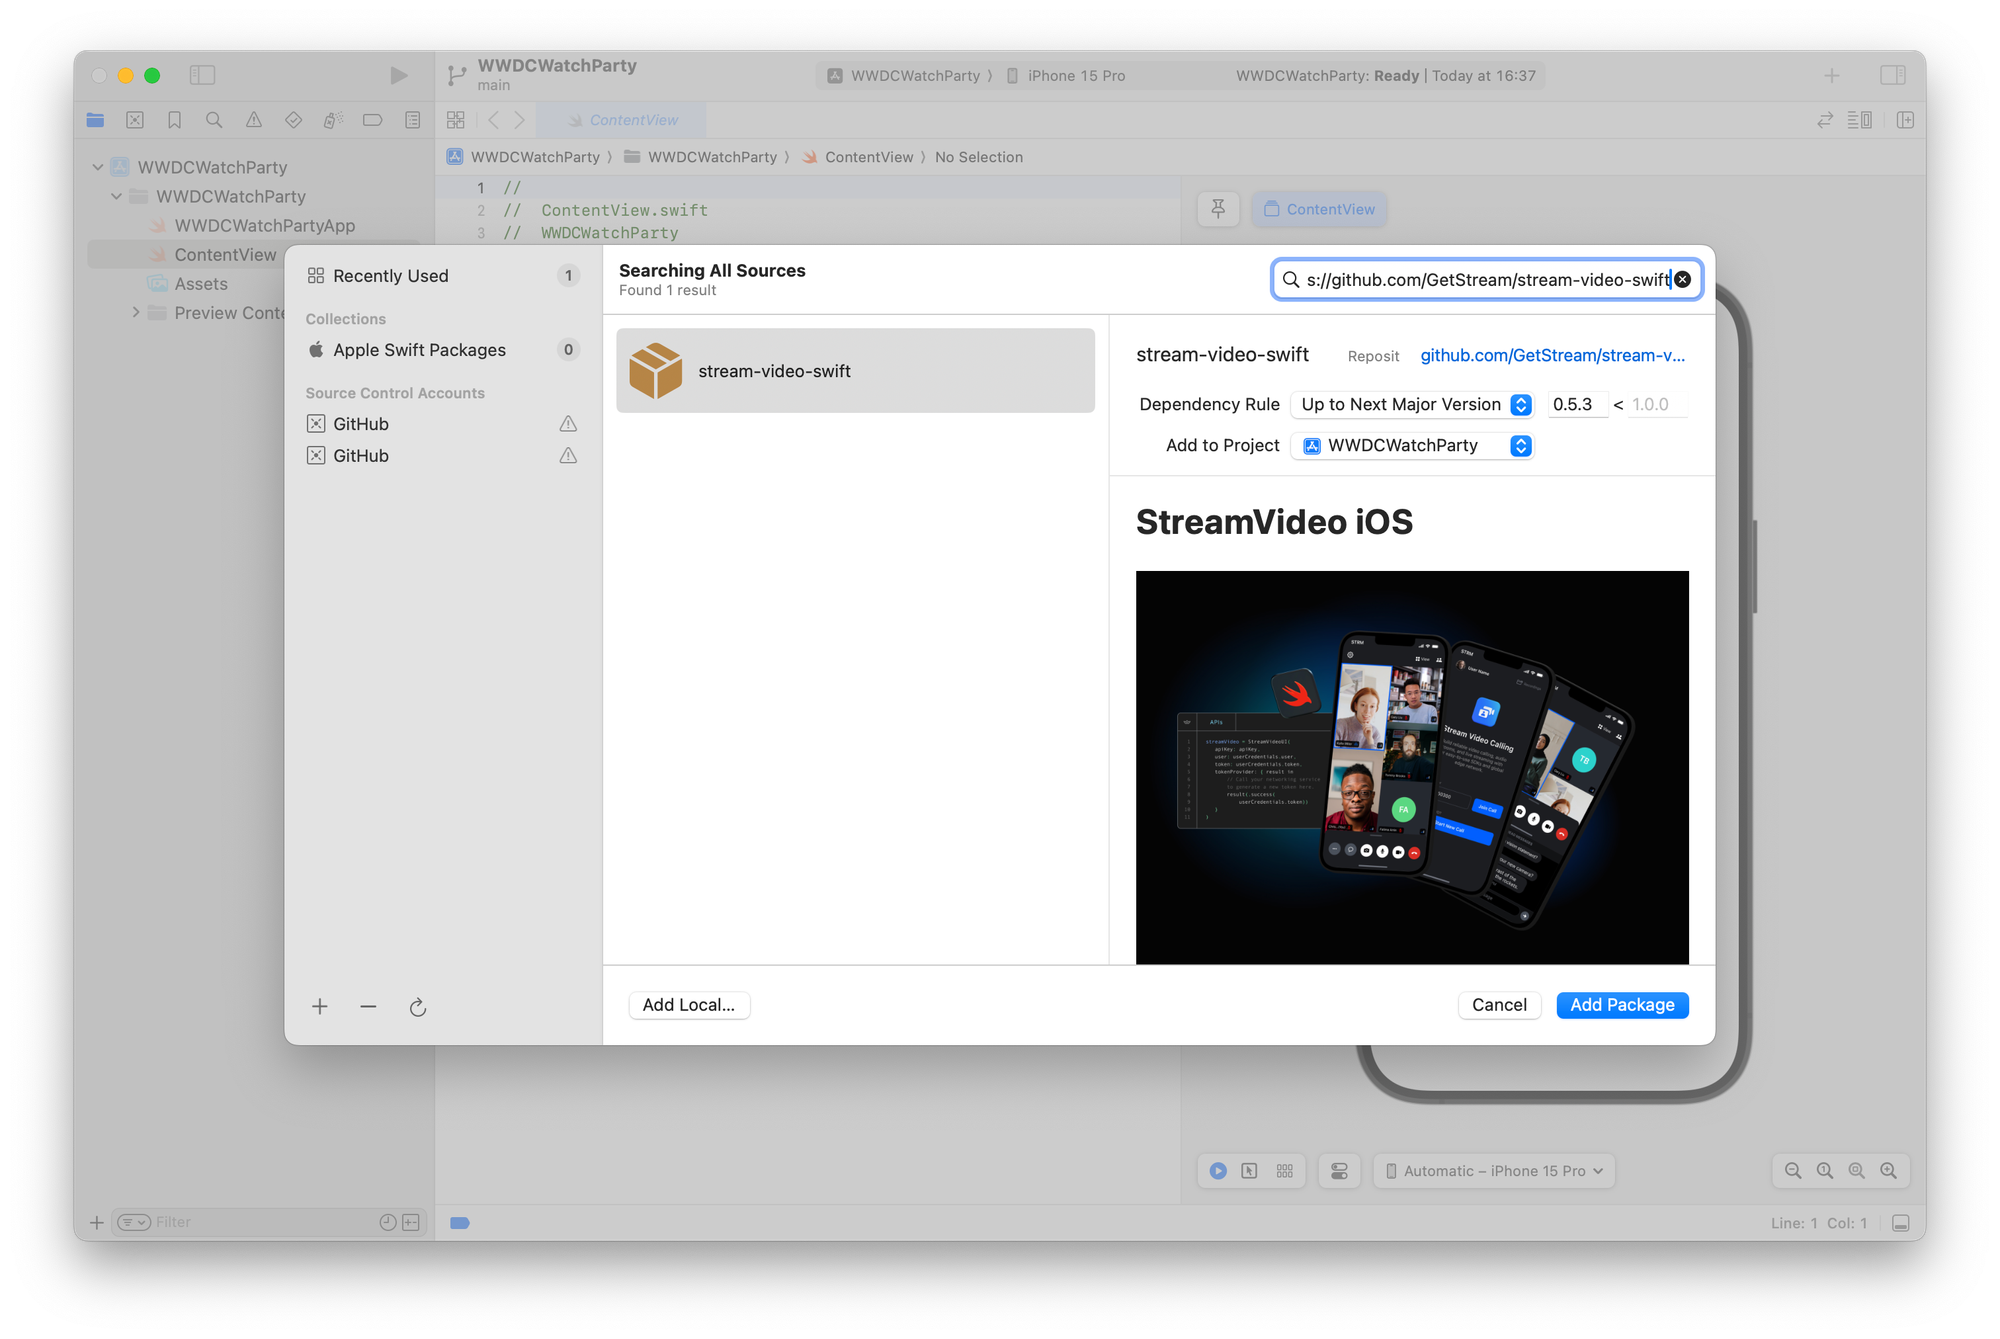
To integrate Stream's Video SDK, we will use Swift Package Manager. In Xcode, navigate to "File" > "Swift Packages" > "Add Package Dependency". In the search bar, enter "https://github.com/GetStream/stream-video-swift" and click "Add Package".
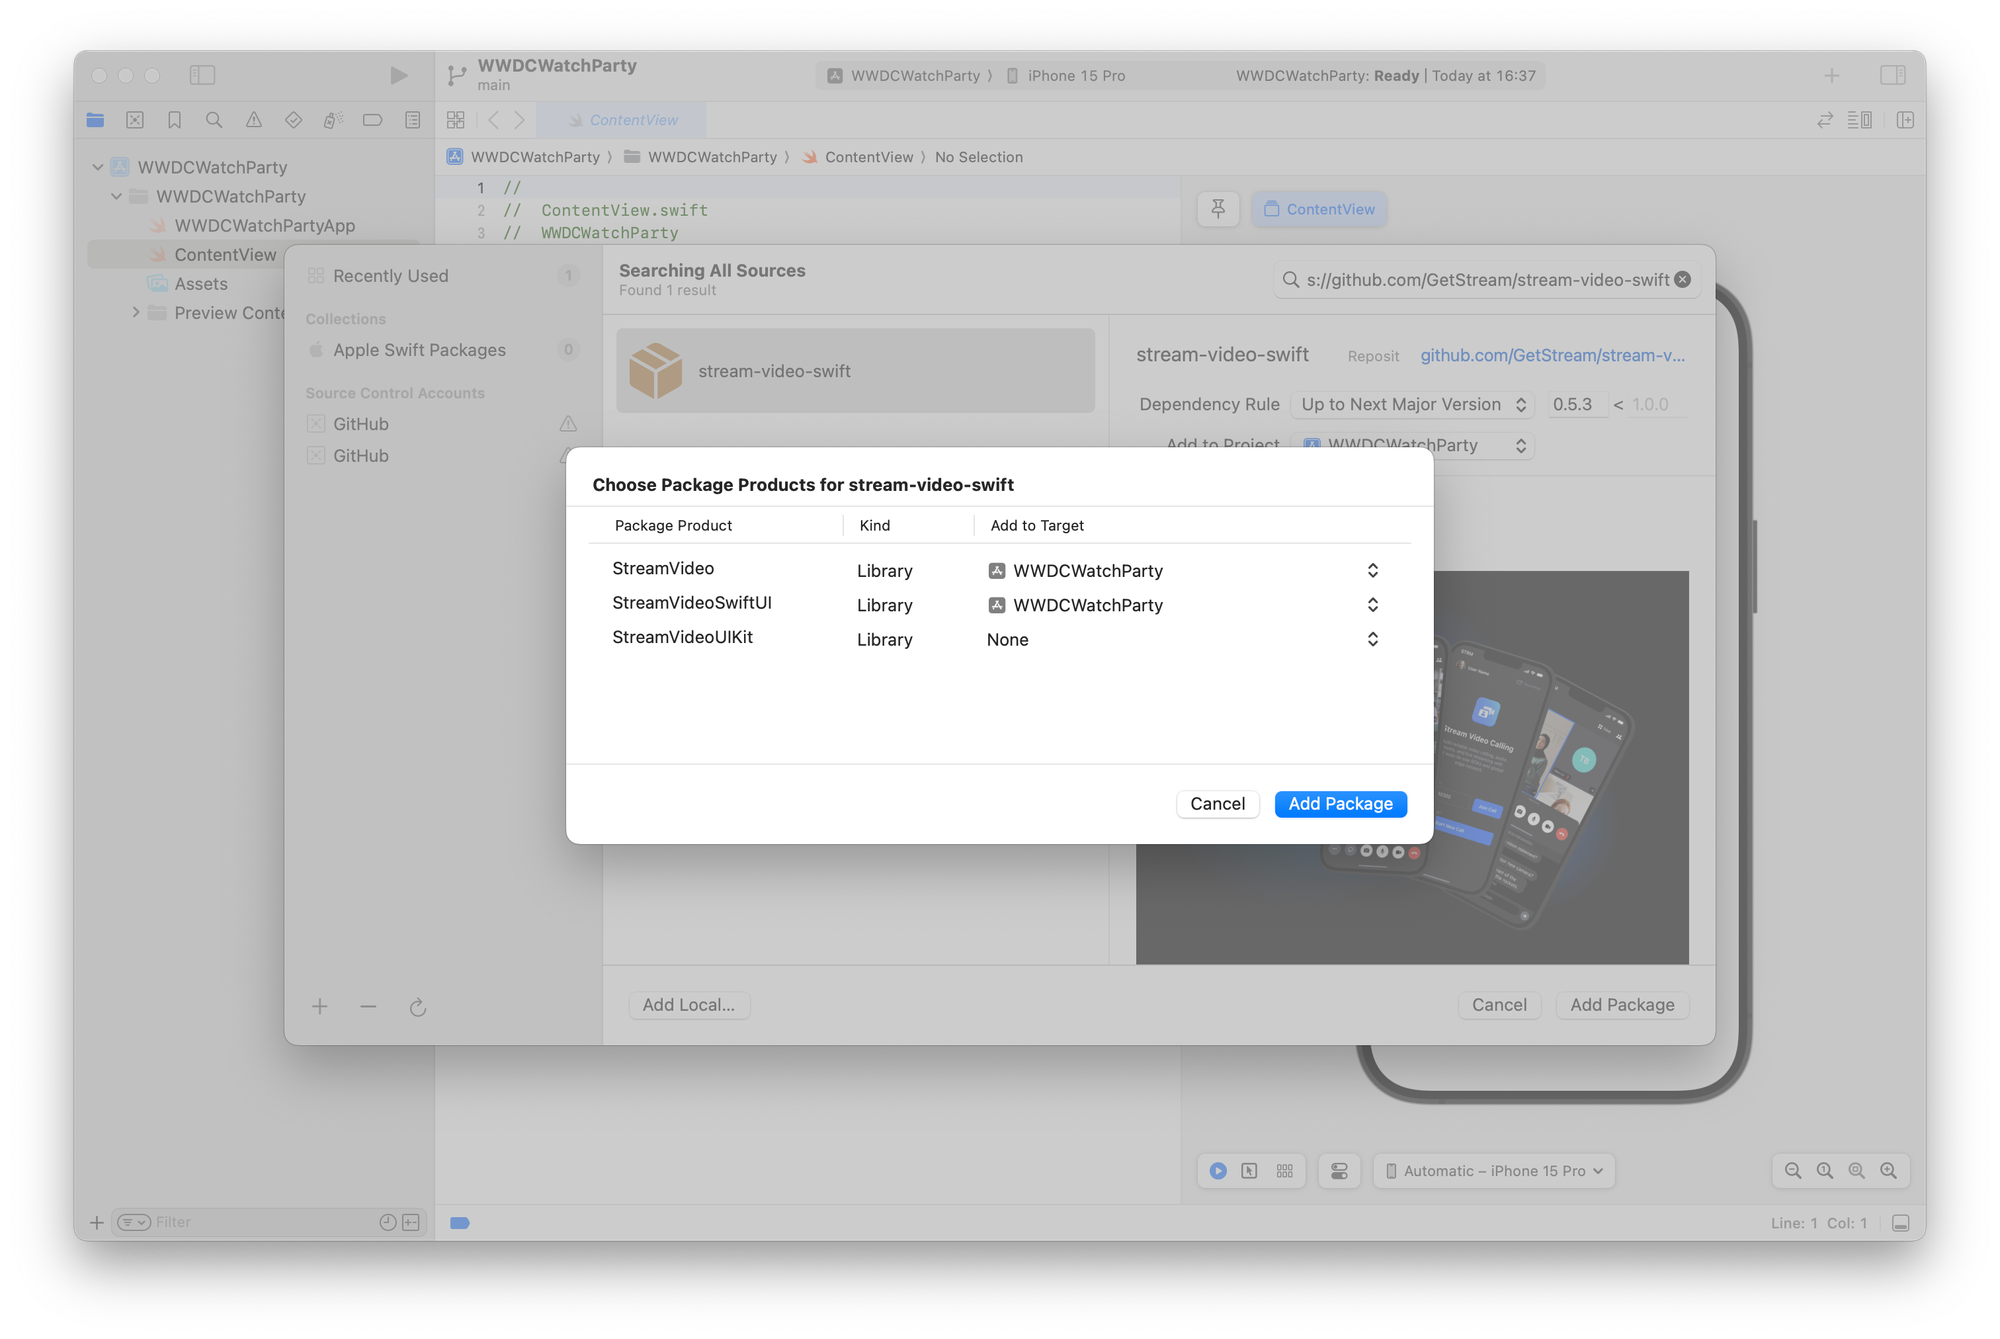
Now, let's select the packages we need. Check the boxes for "StreamVideo" and "StreamVideoSwiftUI" and click "Add Package".
To use the camera and microphone, we need to add the necessary permissions to our app's Info.plist file.
Open the Info.plist file and add the following keys and descriptions:
- Privacy - Camera Usage Description: "Camera access is required to share your video during the WWDC watch party."
- Privacy - Microphone Usage Description: "Microphone access is required to share your audio during the WWDC watch party."
Your Info.plist file should look like this:
<key>NSCameraUsageDescription</key>
<string>Camera access is required to share your video during the WWDC watch party.</string>
<key>NSMicrophoneUsageDescription</key>
<string>Microphone access is required to share your audio during the WWDC watch party.</string>
When the watch party app requests these permissions, the specified descriptions are displayed to the user, providing them with clarity on how the permissions will be used building trust and transparency between the app and the participants.
Implementing Basic WWDC Watch Party Functionality
A "session room" is a virtual space where users can join and watch WWDC sessions together in real-time.
Just like how each WWDC session has its own unique ID, you will want to create a distinct ID for the corresponding watch party room.
To model a session in your app, you can create a Session struct that encapsulates these properties. Here is how you define the Session struct:
struct Session: Identifiable {
  let id: Int
  let title: String
  let videoURL: URL
  let thumbnailURL: URL
}
To provide sample data for testing, you can create an extension on the [Session] array that defines a static property called sampleSessions. This property will hold an array of predefined Session instances:
extension [Session] {
  static let sampleSessions: Self = [
    Session(
      id: 101,
      title: "WWDC 2023 Keynote",
      videoURL: URL(string: "https://events-delivery.apple.com/0105cftwpxxsfrpdwklppzjhjocakrsk/m3u8/vod_index-PQsoJoECcKHTYzphNkXohHsQWACugmET.m3u8")!,
      thumbnailURL: URL(string: "https://i.ytimg.com/vi/GYkq9Rgoj8E/hq720.jpg?sqp=-oaymwEXCNAFEJQDSFryq4qpAwkIARUAAIhCGAE=&rs=AOn4CLAI0BvhdevIRJS89JD9YnXlbsh20w")!
    ),
    Session(
      id: 10072,
      title: "Principles of spatial design",
      videoURL: URL(string: "https://devstreaming-cdn.apple.com/videos/wwdc/2023/10072/5/C43DFF91-F057-43E1-891F-41E6D5C01716/cmaf.m3u8")!,
      thumbnailURL: URL(string: "https://i.ytimg.com/vi/Q1aJy1Hwjp8/hqdefault.jpg?sqp=-oaymwEjCNACELwBSFryq4qpAxUIARUAAAAAGAElAADIQj0AgKJDeAE=&rs=AOn4CLBydTO2C6nUmnN4X_zC66dH8QW2FQ")!
    ),
    Session(
      id: 10109,
      title: "Meet SwiftUI for spatial computing",
      videoURL: URL(string: "https://devstreaming-cdn.apple.com/videos/wwdc/2023/10109/4/F4A066BD-28D9-4CF8-AAF3-D35EA776504F/cmaf.m3u8")!,
      thumbnailURL: URL(string: "https://i.ytimg.com/vi/HEE8qjXQYPc/hqdefault.jpg?sqp=-oaymwEjCNACELwBSFryq4qpAxUIARUAAAAAGAElAADIQj0AgKJDeAE=&rs=AOn4CLClaHmeXbjjIGD7Q5qazy1516u4PA")!
    )
  ]
}
In this example, three sample sessions are defined: the WWDC 2023 Keynote, Principles of spatial design, and Meet SwiftUI for spatial computing. Each session is initialized with its corresponding id, title, videoURL, and thumbnailURL.
Now that you have a model for representing sessions and sample data to work with, you can create a SessionsView to display the list of available WWDC sessions :
import SwiftUI

struct SessionsView: View {
  let sessions: [Session]

  var body: some View {
    NavigationStack {
      ScrollView {
        LazyVStack {
          ForEach(sessions) { session in
            NavigationLink(destination: SessionDetailView(session: session)) {
              VStack {
                AsyncImage(url: session.thumbnailURL) { image in
                  image
                    .resizable()
                    .aspectRatio(contentMode: .fit)
                    .cornerRadius(12)
                } placeholder: {
                  ProgressView()
                }

                Text(session.title)
                  .font(.headline)
                  .multilineTextAlignment(.center)
              }
            }
            .buttonStyle(.plain)
          }
        }
        .padding()
      }
      .navigationTitle("WWDC Sessions")
    }
  }
}

#Preview("SessionsView") {
  SessionsView(sessions: .sampleSessions)
}
This view uses a LazyVGrid to display the sessions in a grid format, with each session showing a play icon and its title. Tapping on a session navigates to the SessionDetailView for that specific session.
Playing a WWDC Session Video
You will need to fetch the video URL of the desired WWDC session. You can achieve this by maintaining a predefined list of session URLs within your app.
Once you have the video URL, you utilize the AVPlayer class from the AVFoundation framework to handle video playback. Here's a breakdown of the code:
private func setupAVPlayer() {
    let asset = AVAsset(url: session.videoURL)
    let playerItem = AVPlayerItem(asset: asset)
    player = AVPlayer(playerItem: playerItem)
}- Create an instance of
AVAssetusing the session's video URL. This represents the media asset you want to play. - Create an
AVPlayerItemfrom theAVAsset. The player item encapsulates the asset and provides additional control over the playback. - Initialize the
AVPlayerwith theAVPlayerItem. TheAVPlayeris responsible for managing the playback of the video.
To ensure a smooth audio experience while we have the microphone enable, it is crucial to configure the audio session properly. The setupAudioSession() function handles this task:
private func setupAudioSession() {
    let audioSession = AVAudioSession.sharedInstance()
    do {
        try audioSession.setCategory(.playAndRecord, mode: .default, options: [.defaultToSpeaker, .mixWithOthers])
        try audioSession.setActive(true)
    } catch {
        print("Failed to set up audio session: \(error)")
    }
}- Obtain the shared instance of
AVAudioSession. - Set the audio session category to
.playAndRecordand the mode to.default. This allows your app to play audio and record audio simultaneously. - Enable the
.defaultToSpeakeroption to route the audio output to the device's speaker by default. - Activate the audio session to apply the configuration.
In the body of your SwiftUI view, you can display the video player using the VideoPlayer view, passing the AVPlayer instance as a parameter:
@State private var player: AVPlayer?

var body: some View {
    VStack {
        if let player {
            VideoPlayer(player: player)
                .frame(height: 300)
        }
    }
    .navigationTitle(session.title)
    .onAppear {
        setupAudioSession()
        setupAVPlayer()
    }
}
The VideoPlayer is a SwiftUI view that plays a video using an AVPlayer instance. The AVPlayer is a powerful class from the AVFoundation framework that allows you to play, pause, seek, and control the playback of media files.
To use the VideoPlayer, you need to provide it with an AVPlayer instance. In this code, the player state variable holds the AVPlayer instance. By using the @State property wrapper, SwiftUI automatically updates the view whenever the player variable changes.
Inside the body of the view, the VideoPlayer is conditionally displayed based on whether the player variable is not nil. This ensures that the video player is only shown when a valid AVPlayer instance is available.
Getting the Calling Feature Working
With the video playing functionality in place, let us now focus on adding an interactive element to our watch party app: the calling feature.
To implement the calling feature, we use Stream's Video iOS SDK. Stream provides some excellent APIs that simplify the process of building in-app video calling functionality.
The first step is to initialize the StreamVideo client with the necessary configuration. The StreamVideo class serves as the main entry point for interacting with the SDK. To create an instance of StreamVideo, you need to provide a valid API key, user, and token.
Here's the general format for initializing the StreamVideo client:
let client = StreamVideo(
  apiKey: "your_api_key",
  user: .guest("user_id"),
  token: .init(stringLiteral: "your_token")
)
Replace "your_api_key" with your actual API key, "user_id" with a unique identifier for the user, and "your_token" with a valid token for authentication.
For testing purposes, you can use the following sample API key and token:
let client = StreamVideo(
  apiKey: "mmhfdzb5evj2",
  user: .guest("Brakiss"),
  token: .init(stringLiteral: "eyJhbGciOiJIUzI1NiIsInR5cCI6IkpXVCJ9.eyJ1c2VyX2lkIjoiQnJha2lzcyIsImlzcyI6Imh0dHBzOi8vcHJvbnRvLmdldHN0cmVhbS5pbyIsInN1YiI6InVzZXIvQnJha2lzcyIsImlhdCI6MTcxMzcwNDgwMCwiZXhwIjoxNzE0MzA5NjA1fQ.tbRfCYcuFh2kTc-ZRFh9GPxEgnoQgfyJ_zheOuzDpIM")
)
After initializing the StreamVideo client, we create a call using the Stream Video SDK. The Call class is an observable object that provides information about the call state and offers methods for updating it.
To create a call, you use the call(callType:callId:) method provided by the StreamVideo client. Here's an example of how to create a call:
let call = client.call(callType: "default", callId: "session_\(session.id)")You invoke the call(callType:callId:) method on the client instance, which represents our initialized StreamVideo client.
The callType parameter specifies the type of call you want to create. In this example, we set it to "default", indicating a standard video call. You can customize the call type based on your app's requirements and any additional features you want to incorporate.
The callId parameter uniquely identifies the call within your app. It allows you to differentiate between multiple calls and ensures that participants can join the correct call. In the provided code, we generate a unique call ID by concatenating the prefix "session_" with the session.id property.
Joining a Call
Once you have created a Call instance, the next step is to establish a connection between the participants for the session.
To join a call, you will use the join(create:) method provided by the Call class. This method takes a boolean parameter create, which indicates whether the call should be created if it does not already exist.
Here is an example of how to join a call using the join(create:) method:
@State private var callCreated = false

Task {
  guard !callCreated else { return }
  try await call.join(create: true)
  callCreated = true
}
The callCreated flag is used to prevent multiple join attempts. It ensures that the join(create:) method is only called once per call instance. This is important because attempting to join a call multiple times can lead to unexpected behavior and waste resources.
Displaying Participants
Watching a WWDC session together is more engaging and interactive when participants in the watch party can see each other! We will create views for both the local participant (the current user) and remote participants (other users in the call):
struct ParticipantsView: View {
  var call: Call
  var participants: [CallParticipant]
  var onChangeTrackVisibility: (CallParticipant?, Bool) -> Void
  var size: CGSize = .init(width: 150, height: 150)

  var body: some View {
    VStack {
      Spacer()
      if !participants.isEmpty {
        ScrollView(.horizontal) {
          HStack {
            ForEach(participants) { participant in
              VideoRendererView(id: participant.id, size: size) { videoRenderer in
                videoRenderer.handleViewRendering(for: participant, onTrackSizeUpdate: { _,_ in })
              }
              .frame(width: size.width, height: size.height)
              .clipShape(RoundedRectangle(cornerRadius: 8))
              .onAppear { onChangeTrackVisibility(participant, true) }
              .onDisappear { onChangeTrackVisibility(participant, false) }
            }
          }
        }
      } else {
        Color.black
      }
    }
  }
}
The ParticipantsView takes three main parameters:
call: An instance of theCallclass representing the current call.participants: An array ofCallParticipantobjects representing the participants in the call.onChangeTrackVisibility: A closure that is called when a participant's track visibility changes, allowing you to handle the visibility state when there are many views to reduce usage of resources.
For each participant, a VideoRendererView is created. The VideoRendererView is a view provided by the StreamVideoSwiftUI framework that handles the rendering of the participant's video track. Inside the closure, you call videoRenderer.handleViewRendering(for:onTrackSizeUpdate:) to handle the rendering of the participant's video track.
To display the participants in your app, you can create an instance of ParticipantsView and provide the necessary parameters:
if let localParticipant = call.state.localParticipant {
  ParticipantsView(
    call: call,
    participants: [localParticipant] + call.state.remoteParticipants,
    onChangeTrackVisibility: changeTrackVisibility(_:isVisible:)
  )
}
We first check if the local participant is available by accessing call.state.localParticipant. If the local participant exists, we create an instance of ParticipantsView and pass the call, participants (combining the local participant and remote participants), and onChangeTrackVisibility closure.
Synchronising Playback with Custom Events
To ensure that the audio and video are in sync for all participants in the watch party, we will need to send custom events from the device that started the session. These events will contain the current playback position, which the other participants can use to keep their players in sync.
We send custom events using the sendCustomEvent(_:) function of the Call class to the other participants in the call:
private func sendPlaybackPositionEvent() {
  guard let player = player else { return }
  Task {
    let customEventData: [String: RawJSON] = [
      "type": .string("playbackPosition"),
      "position": .number(player.currentTime().seconds)
    ]
    do {
      let response = try await call.sendCustomEvent(customEventData)
      print("SUCCESS SENT RESPONSE", response)
    } catch {
      print("Error sending custom event: \(error)")
    }
  }
}
We then create a syncTimer that fires every second while the video is playing. In the timer callback, we will send a custom event with the current playback position:
@State private var syncTimer: Timer?

VideoPlayer(player: player)
  .frame(height: 300)
  .onReceive(player.publisher(for: \.timeControlStatus)) { status in
    if status == .playing {
      syncTimer = Timer.scheduledTimer(withTimeInterval: 1.0, repeats: true) { _ in
        sendPlaybackPositionEvent()
      }
    } else {
      syncTimer?.invalidate()
      syncTimer = nil
    }
  }
Then, we subscribe to custom events to receive updates about the playback position from the main participant and sync your own playback accordingly.
Let us take a closer look at the subscribeToCustomEvents() function that is called after creating a call:
private func subscribeToCustomEvents() {
  Task {
    do {
      for await event in call.subscribe(for: CustomVideoEvent.self) {
        handleCustomEvent(event)
      }
    } catch {
      print("Error subscribing to custom events: \(error)")
    }
  }
}
It uses the subscribe(for:) method provided by the Call class to subscribe specifically to events of type CustomVideoEvent.
Inside a Task block, the function uses a for await loop to asynchronously iterate over the custom events. Each event received is passed to the handleCustomEvent(_:) function for processing. When a custom event is received, it needs to be handled appropriately to sync the playback position:
private func handleCustomEvent(_ event: CustomVideoEvent) {
  if let position = event.custom["position"]?.numberValue {
    syncPlaybackPosition(to: position)
  }
}
It assumes that the custom event contains a "position" key with a numeric value representing the current playback position. If the playback position is successfully extracted, it is passed to the syncPlaybackPosition(to:) function to sync the local playback to the received position:
private func syncPlaybackPosition(to position: Double) {
  let time = CMTime(seconds: position, preferredTimescale: 1000)
  player?.seek(to: time)
}
Using the seek(to:) method of the AVPlayer instance, the local playback is updated to the specified time. This ensures that all participants are in sync and watching the same part of the video.
Conclusion
Stream's SDK makes it easy for developers to create engaging and interactive experiences for their users. With features like live streaming, real-time video playback, and the ability to add custom overlays, Stream's Video SDK provides a solid foundation for building a wide range of video-based apps.
If you are interested in exploring Stream's Video SDK further, I encourage you to check out the official documentation and resources. There is also a blog post by Stream on creating an iOS live-streaming app with SwiftUI.
In the upcoming parts of this blog post series, we will be exploring how to enhance the WWDC watch party experience and integrate chat for discussion during sessions. We will also be diving deeper into Stream's Video SDK and exploring some of its more advanced features.

Master AI-assisted iOS Development
Learn how to use Alex Sidebar, Cursor, Windsurf, VS Code, and other AI tools for your Swift and SwiftUI workflow.